Wednesday, January 31, 2018

Lots of Lavender

     I have been going through my stamp sets both old and new, featuring them either on my YouTube channel or here on my blog. Today, it's my turn to play with my Lots of Lavender stamp set! This is a beautiful stamp set that's exclusive to Sale-a-Bration, so if you don't have it yet, you only have til end of March to get it for free!

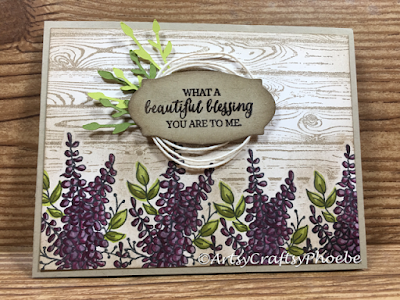
     For this card, I decided to color my lavenders in. No Blends? No problem! I unfortunately don't own the Stampin' Blends (yet), but not to worry since I can use both my Aqua Painters and Blender Pens to easily add color to any project! I painted my lavenders using my Aqua Painter...I just put some Perfect Plum ink onto my acrylic block and used it as my palette. Next I wanted to add details to my flowers so I put a drop of Rich Razzleberry ink refill onto my block and dabbed my Blender pen on it...instant marker!


     For the leaves I stamped them first with the Lemon Lime Twist before putting shading on with my blender pen using Old Olive ink refill. When all of my coloring is done, I made a mask of my flowers using Magic Cover (a transparent shelf liner that I got from the Dollar Store...kinda like a transparent Contact Paper). I used this material because I can trace around my images for creating my mask.


     I covered my flowers with the mask and stamped my Hardwood background with my Crumb Cake ink pad. I then sponged the edges with the same ink. 
     Finally for the sentiment, I die-cut my 'label' piece of Crumb Cake cardstock from the Rose Garden Thinlits set, used Early Espresso to stamp my sentiment from the Rose Wonder stamp set and clear heat embossed it. The leaf stems are die cuts from Everyday Jars Framelits. It doesn't show well in the picture but I also used my Wink of Stella on my sentiment for additional shimmer.
     And that is my card for today crafters! Hope you liked this one, I had lots of fun creating it! Thank you for stopping by and I hope you all have a lovely day! See you next time!

PRODUCTS USED:


Saturday, January 27, 2018

Hanging Garden Emboss Resist

Today I was able to play with my beautiful Hanging Garden stamp set. I bought this set because I thought it would be fun to color in these plants. For today's card though, I decided to do an emboss resist technique instead...just for fun.
This is an easy card to make, with just a bit of embossing and sponging.  First, I lightly lined my Whisper White cardstock at the 4-inch mark so that I know not to go past it with my stamping. This is where I will be tearing it later on.  I then stamped my planters with my Versamark ink, covered it with clear embossing powder, and set it with my heat gun. 
Clear heat embossed stamped images
Next step is to sponge ink onto the cardstock. I used three inks: Crushed Curry, Cajun Craze, and Soft Suede. I love sponging because it is such a quick and easy technique for transferring color, and so I use this technique a lot. 
Now because my images have been heat-embossed, it will resist absorbing the ink that I'm sponging onto my paper...thus why it's called the emboss resist technique.  To get cleaner and more crisp images, just gently wipe away the ink on top of the embossed images when done sponging. I then sprayed the whole piece with plain water just for additional effect. Once dry, I just tore the bottom part and adhered my piece onto the card base.
I wanted to add a bit of shine to my card, so I decided to use my Year of Cheer washi tape with my sentiment. This washi tape has beautiful gold foiled details...sadly though, this set has been retired. Moving on to my sentiment, I gold-embossed it onto a die-cut stitched oval piece of whisper white cardstock. I also lightly sponged the edges of the oval with Soft Suede before sticking it to my card base. Lastly for additional shine, I glued gold sequins in different sizes at the bottom of my card. 
And just like that, my card is done! I like how the colors turned out, especially with colors I don't usually use together. Well I hope you enjoyed this card crafters and hope to see you next time. Have a lovely day!

PRODUCTS USED:


Monday, January 22, 2018

Beautiful You Watercolor Effect

      It is my beautiful sister-in-law's birthday and I need to make her a card. I wanted to do a watercolor effect card but done easily & quickly, without all the fuss of actual watercoloring. I wanted to use just ink pads with all my coloring too...easy-peasy. For her card, I used the Beautiful You stamp set together with the Wild About Flowers stamp set.
 
 
     I started my card by running my layering piece of Very Vanilla through my Big Shot with the largest stitched oval framelit. The oval cut-out piece is where I'm gonna be stamping and doing my watercoloring.
     
     I tried a few techniques to see what worked best for the watercolor effect. I tried stamping first, and then trying to spread the color with my aqua brush...that's a no-go. I tried switching to my blender pen...still no. I even tried it on watercolor paper...the ink simply just won't budge once it's down on paper. I next tried to stamp and then spray with a bit of water to help move the ink. This just warped my paper terribly so I decided to ditch that too. And then finally it dawned on me...why not ink my stamp and spray it with water before stamping on paper?! That way the ink is definitely moving and I'll have more of a watercolor effect. Perfect!
 
My inked stamp spritzed with water
 
Comparison of a straight-stamped image to a
spritzed-before-stamped image
     After my first layer of Pool Party ink, I then moved on to Marina Mist and the smaller squiggle stamp to add depth to my watercolor sky. I repeated this technique for my grass using my Pear Pizzazz ink pad, as well as for coloring in her dress using my Fresh Fig. 
     I then moved on to stamping the flowers at the bottom of the oval. For that I used my Old Olive and Calypso Coral ink pads. For additional detail I just put white dots on the flowers using my white gel pen. Then I lined up my layering piece of Very Vanilla (with the oval opening) against the Calypso Coral piece and glued my watercolor piece right through the opening onto the Calypso Coral...this way I know that my oval piece is right where I want it to be. Next I just added some ribbon for embellisment.
     For additional dimension, I put foam tape at the back of the Very Vanilla piece before adhering it to my Calypso Coral piece. Lastly, I added my sentiment. And my simple watercolor card is done! 
     This technique was so easy and simple to do but with big results, which I love. I'm sure glad my experiments paid off! Here's hoping my sister-in-law likes her card! Well I hope you enjoyed my card for today crafters and I hope you all have a lovely day! See you next time!

PRODUCTS USED:

Wednesday, January 17, 2018

Chillin' Panda

     I don't know about you, but I cannot wait for the summer! I wanna be outside basking in the warm sunshine (preferably with a drink in my hand!), swimming in the lake and just enjoying life. Well summer is still a few months away, so the second best thing to do is to create a card based on this idea...and my Party Pandas was up for this challenge!
     When I saw the panda sitting with a balloon, my first thought was that he should be sitting on a chair! So I pulled out my Colorful Seasons stamp set which I knew had a beach chair on it, and I was already picturing my panda in a beach scene. Unfortunately, the chair (or the panda, depending on how you look at it) was facing the wrong way. Good thing I can easily remedy that with the mirror stamping technique (refer to previous blog :).
     
     I have to admit though that when I stamped my panda, for some reason I can't get a crisp image. There were spots in the legs and eyes that won't stamp fully when doing the mirror stamping. I tried different inks, surfaces other than my embossing mat, and still I can't get a perfect mirror image. So in the end I just colored it in with my black marker which was easy enough to do. 
     After cutting out my panda, I moved on to my background. I used the largest circle stitched framelit to cut out a piece of Whisper White cardstock. I then sponged the top half of it with my Crushed Curry & Pumpkin Pie ink pads for the sky, and then the bottom half with Dapper Denim & Soft Sky for the sea. I also sprayed my piece with my shimmer spray just for additional effect.
 
Using my blender pen to color in the gap
between the chair and the circle
 
Using my blender pen to put shadows under
the chair
     I then glued my circle piece onto a piece of Whisper White cardstock (4" x 5 1/4") and then stamped my chair on the lower right edge of my circle. I used my stamp positioning tool for this (I haven't received my Stamparatus yet) so that I can re-stamp this for a crisp image. And because of the uneven surface, my chair didn't stamp fully along the edges of the circle, so I used my blender pen and my Dapper Denim ink pad to cover up this gap. I also used my blender pen to put some shadows under the chair with my Sahara Sand ink pad.
     After stamping my sentiment, I then just glued my panda onto the chair, put a drink in his hand, popped sunglasses on his face, and gave him an umbrella to hold on to instead of a balloon. And this is my finished card! 
        Isn't he just adorable?!? I wish I'm doing exactly this right now! Anyway I hope you enjoyed today's card crafters and I hope you all have a lovely day! See you next time!

PRODUCTS USED:


Sunday, January 14, 2018

Hedgehugs Mirror Image Technique

     Have you ever wished that a stamp was facing the other way instead? Well that's what I wanted to do as soon as I saw the Hedgehugs stamp set...I wish those cute critters were facing the other way too! I have an image in my mind of two hedgehogs facing each other and holding a heart in between...so I had to learn how to do mirror image stamping!
     
     I tried a variety of techniques...from using a piece of window sheet, the flat back of a stamp, to using a stamping material designed for my cutting machine. None of them worked as well as using my embossing mat on my stamp positioning tool. The embossing mat just provided enough cushion and is less slippery than the other materials I tried so there is less chance of smearing. 
          I enjoyed this technique so much that I made two cards with it! Watch my video tutorial below and see how easy it is to do this technique. I already have another card in mind for using this technique again. Until then, see you next time and have a lovely day crafters!

Friday, January 12, 2018

Bird Banter Fun

     So my order from the new catalogue finally arrived (woot woot!)!!! First order of business: play with the Bird Banter stamp set of course! This was  one of my must-haves while I was perusing the 2018 Occasions catalogue...it just looked so fun and playful...I knew I had to get it. 

     Anyway I was super excited to play with this set. I had the idea to perch the birds on top of power lines, just for fun. And so I came up with two cards using the same design but different techniques and materials.
     For the first card, I did a watercolor background using my Picture Perfect Party ink spots, a piece of plastic, and a spray bottle. It's easy to create this background effect: just dab ink randomly on any plastic piece (using the smaller ink spots work best for this technique as they are easier to handle), spray water on it to move the ink, and apply to your piece of cardstock. 


     I then stamped my birds on a scrap piece of Whisper White cardstock, colored them in, cut them out and arranged them on top of the power lines. And finally my layering piece is from the Sale-a-bration item Sweet Soiree memories & more card pack. (I just LOVE free stuff...don't you!!?!?!?)
  
     Moving on to my second card, I decided to make it a bit simpler. 
Instead of cutting out my birds, I did a little bit of masking. I then just stamped clouds randomly, this is from the stamp set This Little Piggy (another fave of mine!). 


     For additional interest I sponged the edges of my cardstock lightly with my Dapper Denim ink pad. Lastly my layering piece is from the Petal Passion memories & more card pack. I also used my Wink of Stella on all of my birds because my cards ALWAYS have to have a bit of sparkle! ;)

     So which card do you guys prefer? I think I like the first card better just because of the pop of color in it. I enjoyed making these and plan to make more projects with this fun stamp set...after I get to play with my other equally fun new toys ;) Thanks for stopping by and have a lovely day crafters!

Sunday, January 07, 2018

Vintage Leaves Emboss Resist

Sympathy cards are not fun to make...because they represent the loss of a loved one.
A friend of mine just lost her grandfather this Christmas, and I wanted to make her
a beautiful card to convey my condolences. This is the card I made.
 The card I made for her is a simple one, but looks elegant in my opinion. I used my beautiful Vintage Leaves stamp set and gold embossed the leaves. For my background I did an emboss resist technique using my Hardwood stamp. And finally my sentiment is from the Rose Wonder stamp set, with the coordinating thinlits dies. 

This card is so versatile, it can be for any occasion or gender. So i did a birthday card too, thinking of giving it to one of my guy friends. I hope you enjoyed this card and try making one too! Video tutorial below. Have a lovely day crafters!


PRODUCTS USED:

Monday, January 01, 2018

Year of the Dog

Calgary has been in a deep freeze a few days ago, with temperatures 
of -30 but -41 with the wind chill. BRRRRRRR. 
So what do you do when it is this cold outside?! Why, craft of course!!!

I decided to stay in my craft room all day and plan for my year ahead. I needed
inspiration as to where to start though, and I found it in the Chinese zodiac signs.
Apparently, 2018 is the Year of the Dog! Well, hey, I love dogs! So I have 
decided to make use of my Bella and Friends stamp set (one of my faves)
for this week's card...and I came up with this.
This is a quick and simple card to make, and I think it looks so cute! 
This would be an adorable birthday card for a kid...it looks cartoony. Video tutorial
of how I made this card down below.

And of course, I could not end this blog post without showing you guys my
darling Tayla! She is a Cavapoo (King Charles cavalier spaniel crossed with
a toy poodle), she's six, and she is our sweetheart! She has the sweetest
temperament and we just love her to pieces.
Anyway I hope you guys are all staying safe and warm. 
Have a lovely day, crafters, and I hope to see you next time!

PRODUCTS USED: